Architecturally Exposed Structural Steel
The AESS Matrix
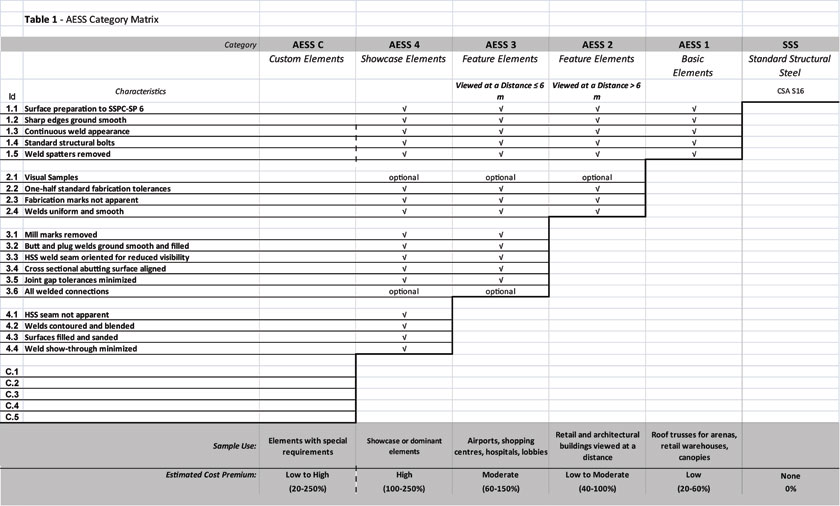
The AESS Matrix ties the AESS Categories and Characteristics together and provides the Architect, Engineer and Fabricator with an easy to use, graphic interface, through which to discuss the expectations of the finish and quality of the final product.

The CISC Category Matrix encompasses 4 Categories (AESS 1 through AESS 4). Each category represents a set of characteristics, which clarifies what type of work will be performed on the steel, the tolerances to be met, and if a visual sample is needed. For AESS 1, the associated characteristics are 1.1 through 1.4, for AESS 2, they are 1.1 through 2.4, and so on. The categories are selected by the architect. They are specified at bid time, as an AESS subdivision of the Structural Steel division in the engineer's documents. The categories appear on architecture, engineering, detailing and erection documents. In general, it is expected that AESS 2 (for elements viewed at a distance) and AESS 3 (for elements viewed at close range) will be the categories most commonly specified. For more detailed information, see www.cisc.ca/aess.
NOTES
1.1 Prior to blast cleaning, any deposits of grease or oil are to be removed by solvent cleaning, SSPC-SP 1.
1.2 Rough surfaces are to be deburred and ground smooth. Sharp edges resulting from flame cutting, grinding and especially shearing are to be softened.
1.3 Intermittent welds are made continuous, either with additional welding, caulking or body filler. For corrosive environments, all joints should be seal welded. Seams of hollow structural sections shall be acceptable as produced.
1.4 All bolt heads in connections shall be on the same side, as specified, and consistent from one connection to another.
1.5 Weld spatter, slivers, surface discontinuities are to be removed. Weld projection up to 2 mm is acceptable for butt and plug welded joints.
2.1 Visual samples are either a 3-D rendering, a physical sample, a first off inspection, a scaled mock-up or a full-scale mock-up, as specified in Contract Documents.
2.2 These tolerances are required to be one-half of those of standard structural steel as specified in CSA S16.
2.3 Members marked with specific numbers during the fabrication and erection processes are not to be visible.
2.4 The welds should be uniform and smooth indicating a higher level of quality control in the welding process.
3.1 All mill marks are not to be visible in the finished product.
3.2 Caulking or body filler is acceptable.
3.3 Seams shall be oriented away from view or as indicated in the Contract Documents.
3.4 The matching of abutting cross-sections shall be required.
3.5 This characteristic is similar to 2.2 above. A clear distance between abutting members of 3 mm is required.
3.6 Hidden bolts may be considered.
4.1 HSS seams shall be treated so they are not apparent.
4.2 In addition to a contoured and blended appearance, welded transitions between members are also required to be contoured and blended.
4.3 The steel surface imperfections should be filled and sanded.
4.4 The back face of the welded element caused by the welding process can be minimized by hand grinding the backside of the weld. The degree of weld-through is a function of weld size and material.
C. Additional characteristics may be added for custom elements.
